9.*. COHERENT COMPASS 115M-5 Green Laser
9.2.*. COMPASS-115M-5.
I remind you that we are talking about Solid-State Laser - COMPASS-115M-5 (started on this page). This laser has many useful properties. For example, a) light is stable and adjustable, b) has single-mode light beam, c) monochromatic d) green color make possible to use this laser for recording holographic images, etc.
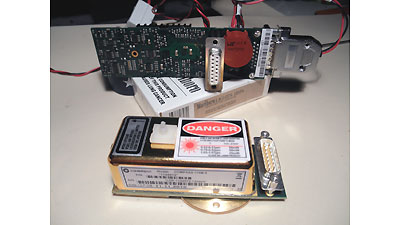
The controller board has 2 connectors - power and control. The last one can switch laser beam 'on' / 'off' , control laser power, send info about internal parameters and so on. But now it does not matter. It is non-working laser head. And we, with peace of mind, can look in the middle (take a part!).
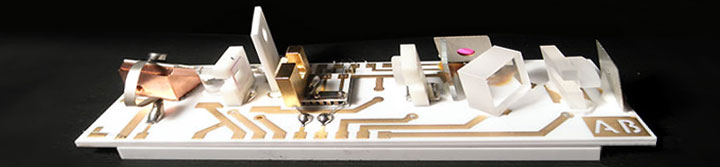
How to remove the controller and pick up a corner of the cover with a flat screwdriver - I will not write. This method is not "humane", but fast and efficient. Anyway, what inside this laser head we can see in the following pictures.
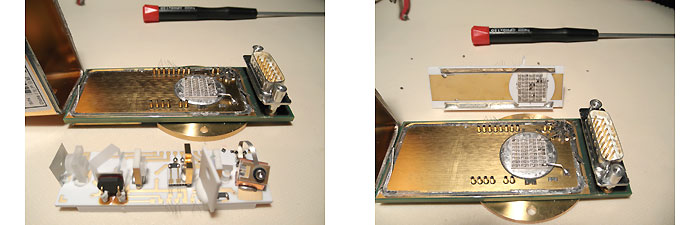
I did not expect that the laser is designed simply, but the presence of two " Interestingly, the solid-state cooler is fragile, but very durable product. After experimenting with several of these coolers, I can say that it can break down and lift the corner of a flat screwdriver and with a huge effort." coolers was a surprise. The first is under the ceramic plate of the laser. Its remains can be seen in the right photo. Round brass plate, which is under the laser head, is part of the Heat Sink.
Interestingly, the thermoelectric cooler is fragile, but very durable product. After experimenting with several of these coolers, I can say that it not easy to break it down. To broke it you must lift the corner with a flat screwdriver and with a huge effort.
"In the life," this laser is installed in the box, which on the photo, below. This is the product of a 3-mm steel, plus aluminum base, thickness not less than 15 millimeters.
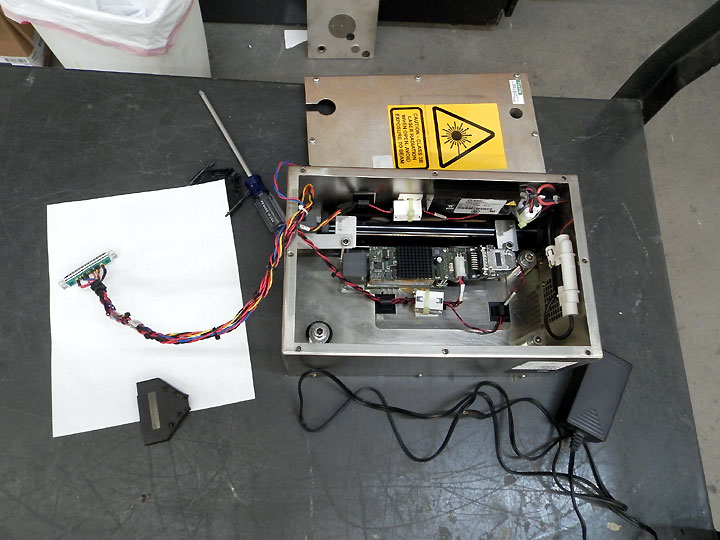
So, what would a cooler broke, this box must be dropped from a height, no less than from the second floor.
The following pictures show German quality of manufacturing and assembly. The conductors are welded and duplicated. Soldering - the highest level. * In addition, the right photo you can see the second semiconductor cooler with thermal sensor.
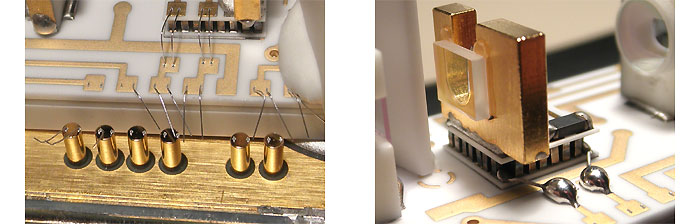
For fans of gold, I will say that it is a gold. But this is a very thin film of gold on top of copper. It is easy to remove with school's eraser.
Lasers, sometimes, mysteriously broken. And often, it happens because these lasers have visited to the "capable hands." Example, which does not leave a chance to restore on the right photo.
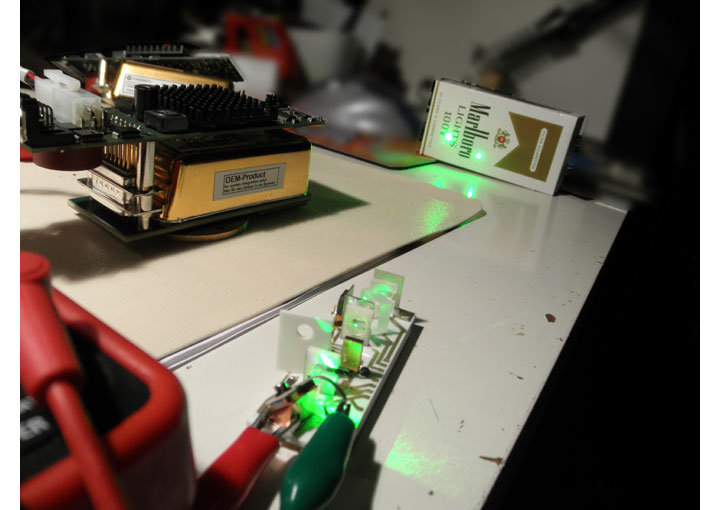
The primary laser, or the system of "pumping", is a Laser Diode. So it is easy to run on direct current. How this is done can be clearly shows on the next picture.
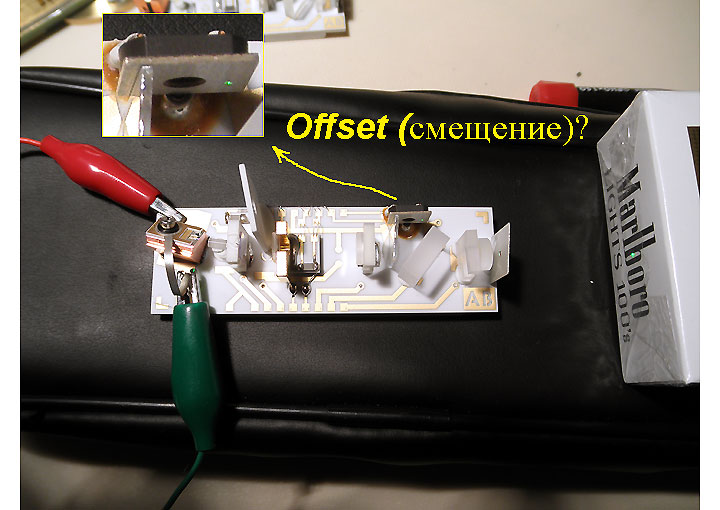
If you look closely, you immediately apparent problem with this laser. Green dot is off-pupil photo detector which regulates the parameters of output beam. Normal operation of this laser head is out of the question. You can, of course, move the prism / mirror or shift photo detector. But we will not do this.
The first interesting thing is that the Laser Diode (or primary laser) takes a current up to 2A. Documentation - none. Operating current of the laser can be determined, only, indirectly by comparing the light from two lasers. In this case it is enough to get the same spot light diameter of identical construction lasers.
Interestingly, on pictures, both spots have a little different diameters. But through protective glasses they was looked exactly same. Apparently the camera has it's personal "opinion."
As a result, operating current of the Laser Diode (laser pump) - 0.6 A (voltage drop 2,6 V).

Now is the time for the second laser, which is not more fortunate. The same current (0.6 A) and voltage (2,6 V). In the picture the Laser Diode emits signs of life. In fact, if you look closely, you can see the faint red glow.
All digital cameras have one feature. They have some sensitivity beyond the visible range. The next photo shows how the camera sees Infra Red (IR, 1064 nm) light. More specifically, we see the length of the wave, which is two times longest than the wavelength of the green light (532 nm).
Now it remains to check the installation of the laser and the first lens. Method is simple and power (5 mW of green) allows it.
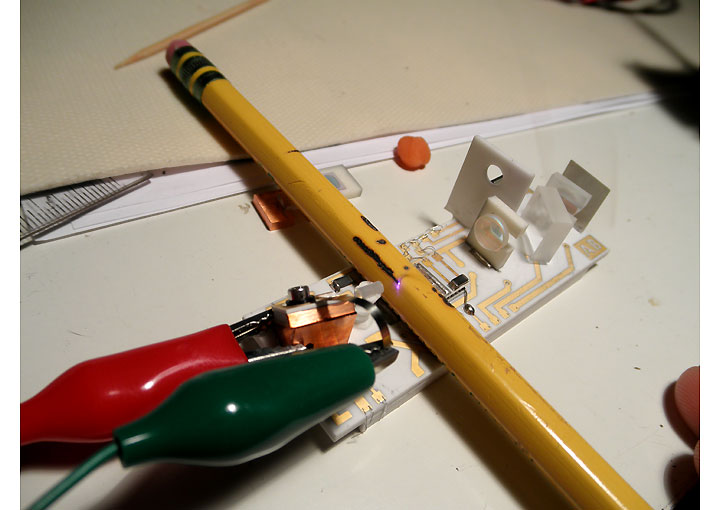
Why, with the same output power (5mW), such a laser burns a pencil, and a red laser pointer - not? Because the green laser, by design, has excellent parameters of output beam and extremely low efficiency. Other hand, the red laser pointer - the opposite. In addition, we use light to convert. Please note that the Laser Diode Pump consumes about 2 watts.
The last experiment shows can I configure such a laser in the "home"? For example, the laser is taken which had fallen off the elements responsible for the conversion of invisible radiation.
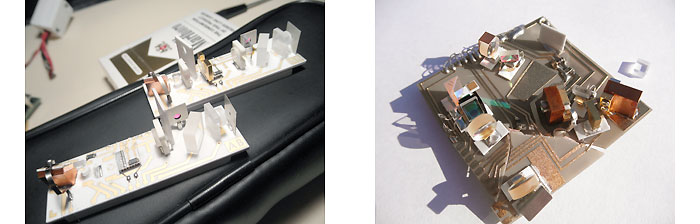
Clay, red laser pointer and a flat table - all that is needed. "Optical bench" in the home version. This stand is easy to set up. All you need to be seen in the photo.
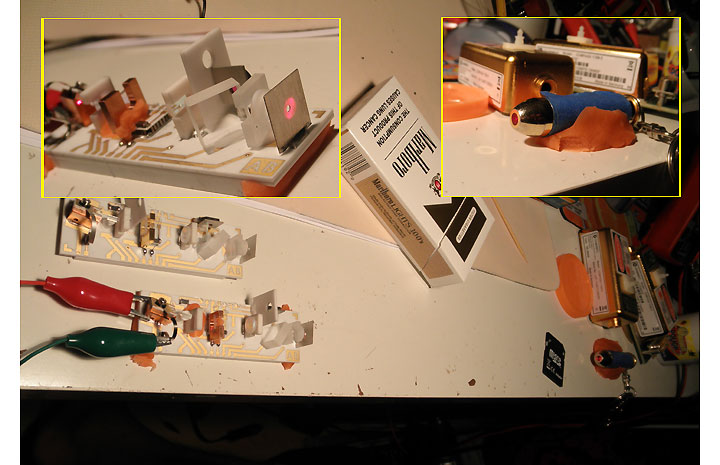
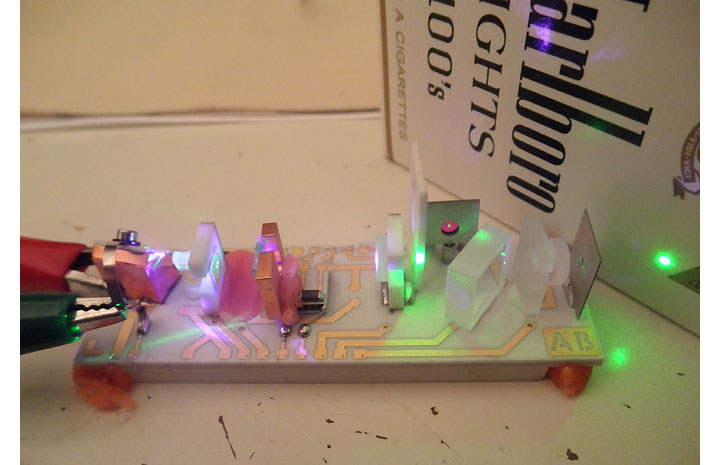
The main idea of set up - to make all the parts in parallel, and on the same axis. You can then choose the spacing between for maximum beam power. I not to say that it is easy. But it is possible (case of 10 minutes). One of the intermediate configuration looks like.
When it is too difficult and does not work, you should take a few pictures that would make sure that the laser pump works. Look into the laser beam, even through protective glasses - not recommended. My glasses reduce laser radiation up to 40 times, and 1 mW laser light arriving on the eye can cause a momentary loss of vision. So, my safe level - less then 40 mW. The optical power of this laser, in the invisible spectrum, more than 50 mW. If there were any doubt, go back to the photo, where IR laser beam burns my pencil. So the risk is not necessary.
The white dot in the center of the photo - direct laser light (IR) from the Laser Diode Pump. Highlights closes weak red, visible through the glasses (the moment, when not enough power to get start green beam).
The intensity of the green laser beam and the power of IR pump is nonlinear. Green beam appears, then when the infrared energy is higher than a certain level. The following picture show moment when green light just started to appear.
With this laser we can do a lot of interesting experiments. For example, with green light of this laser, we can create very unusual photos.
In this case, we see the reflection of the white sheet of paper, with a very slow shutter speeds.
Sorry. Not finished yet.
Page about connecting power to this laser was here. Now it's time to take it apart and see what's in the middle. We disassemble only lasers that already broken, of course.
I remind you that we are talking about Solid-State Laser - COMPASS-115M-5 (started on this page). This laser has many useful properties. For example, a) light is stable and adjustable, b) has single-mode light beam, c) monochromatic d) green color make possible to use this laser for recording holographic images, etc.
The controller board has 2 connectors - power and control. The last one can switch laser beam 'on' / 'off' , control laser power, send info about internal parameters and so on. But now it does not matter. It is non-working laser head. And we, with peace of mind, can look in the middle (take a part!).
How to remove the controller and pick up a corner of the cover with a flat screwdriver - I will not write. This method is not "humane", but fast and efficient. Anyway, what inside this laser head we can see in the following pictures.
I did not expect that the laser is designed simply, but the presence of two " Interestingly, the solid-state cooler is fragile, but very durable product. After experimenting with several of these coolers, I can say that it can break down and lift the corner of a flat screwdriver and with a huge effort." coolers was a surprise. The first is under the ceramic plate of the laser. Its remains can be seen in the right photo. Round brass plate, which is under the laser head, is part of the Heat Sink.
Interestingly, the thermoelectric cooler is fragile, but very durable product. After experimenting with several of these coolers, I can say that it not easy to break it down. To broke it you must lift the corner with a flat screwdriver and with a huge effort.
"In the life," this laser is installed in the box, which on the photo, below. This is the product of a 3-mm steel, plus aluminum base, thickness not less than 15 millimeters.
So, what would a cooler broke, this box must be dropped from a height, no less than from the second floor.
The following pictures show German quality of manufacturing and assembly. The conductors are welded and duplicated. Soldering - the highest level. * In addition, the right photo you can see the second semiconductor cooler with thermal sensor.
For fans of gold, I will say that it is a gold. But this is a very thin film of gold on top of copper. It is easy to remove with school's eraser.
Lasers, sometimes, mysteriously broken. And often, it happens because these lasers have visited to the "capable hands." Example, which does not leave a chance to restore on the right photo.
The primary laser, or the system of "pumping", is a Laser Diode. So it is easy to run on direct current. How this is done can be clearly shows on the next picture.
If you look closely, you immediately apparent problem with this laser. Green dot is off-pupil photo detector which regulates the parameters of output beam. Normal operation of this laser head is out of the question. You can, of course, move the prism / mirror or shift photo detector. But we will not do this.
The first interesting thing is that the Laser Diode (or primary laser) takes a current up to 2A. Documentation - none. Operating current of the laser can be determined, only, indirectly by comparing the light from two lasers. In this case it is enough to get the same spot light diameter of identical construction lasers.
Interestingly, on pictures, both spots have a little different diameters. But through protective glasses they was looked exactly same. Apparently the camera has it's personal "opinion."
As a result, operating current of the Laser Diode (laser pump) - 0.6 A (voltage drop 2,6 V).
Now is the time for the second laser, which is not more fortunate. The same current (0.6 A) and voltage (2,6 V). In the picture the Laser Diode emits signs of life. In fact, if you look closely, you can see the faint red glow.
All digital cameras have one feature. They have some sensitivity beyond the visible range. The next photo shows how the camera sees Infra Red (IR, 1064 nm) light. More specifically, we see the length of the wave, which is two times longest than the wavelength of the green light (532 nm).
Now it remains to check the installation of the laser and the first lens. Method is simple and power (5 mW of green) allows it.
Why, with the same output power (5mW), such a laser burns a pencil, and a red laser pointer - not? Because the green laser, by design, has excellent parameters of output beam and extremely low efficiency. Other hand, the red laser pointer - the opposite. In addition, we use light to convert. Please note that the Laser Diode Pump consumes about 2 watts.
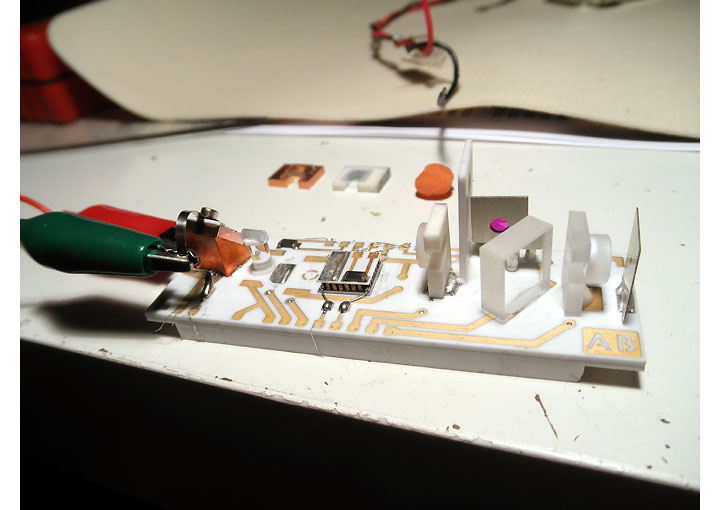
The last experiment shows can I configure such a laser in the "home"? For example, the laser is taken which had fallen off the elements responsible for the conversion of invisible radiation.
Clay, red laser pointer and a flat table - all that is needed. "Optical bench" in the home version. This stand is easy to set up. All you need to be seen in the photo.
The main idea of set up - to make all the parts in parallel, and on the same axis. You can then choose the spacing between for maximum beam power. I not to say that it is easy. But it is possible (case of 10 minutes). One of the intermediate configuration looks like.
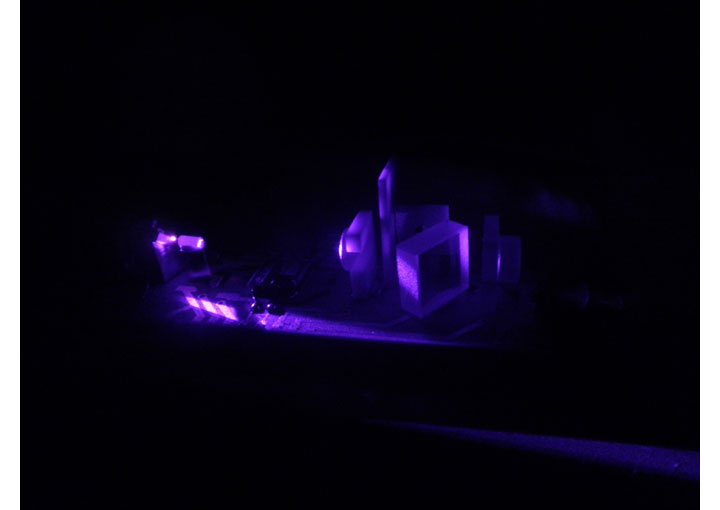
When it is too difficult and does not work, you should take a few pictures that would make sure that the laser pump works. Look into the laser beam, even through protective glasses - not recommended. My glasses reduce laser radiation up to 40 times, and 1 mW laser light arriving on the eye can cause a momentary loss of vision. So, my safe level - less then 40 mW. The optical power of this laser, in the invisible spectrum, more than 50 mW. If there were any doubt, go back to the photo, where IR laser beam burns my pencil. So the risk is not necessary.
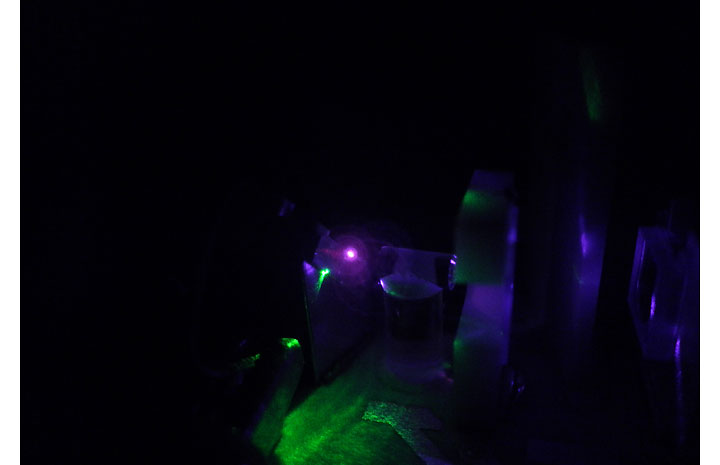
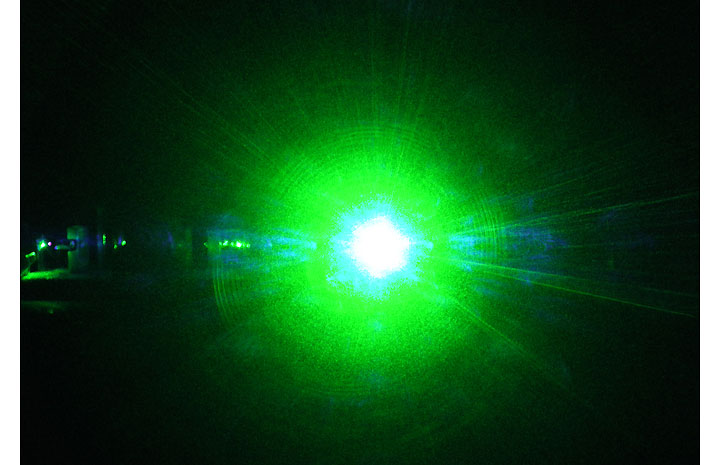
The white dot in the center of the photo - direct laser light (IR) from the Laser Diode Pump. Highlights closes weak red, visible through the glasses (the moment, when not enough power to get start green beam).
The intensity of the green laser beam and the power of IR pump is nonlinear. Green beam appears, then when the infrared energy is higher than a certain level. The following picture show moment when green light just started to appear.
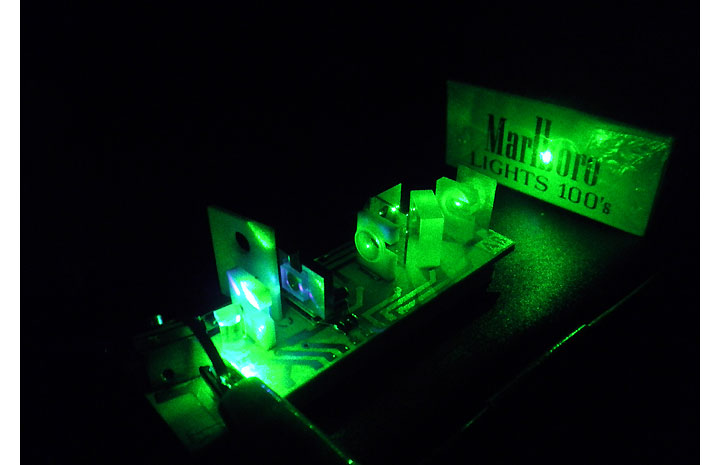
With this laser we can do a lot of interesting experiments. For example, with green light of this laser, we can create very unusual photos.
In this case, we see the reflection of the white sheet of paper, with a very slow shutter speeds.
Sorry. Not finished yet.