
17. Simple electronic devices.
17.29. Static IP address + Tiny Core.

Four steps are required to assign a static IP address:
1. Create a new config file for interface (/opt/eth0.sh);
2. Start it on BOOT time (add eth0 to /opt/bootlocal.sh);
3. Save file (/opt/eth0.sh) for next BOOT (add to /opt/.filetool.lst);
4. Backup changes (filetool.sh -b).
Static IP address on eth0. Add config & run. Short story, skip the rest.
--- Boot from CF card ---
sudo vi /opt/eth0.sh
Esc, i
add-> #!/bin/sh
add-> ifconfig eth0 192.168.153.39 netmask 255.255.255.0 broadcast 192.168.153.255 up
add-> route add default gw 192.168.153.1 add-> </body>
add-> echo nameserver 192.168.153.1 > /etc/resolv.conf
add-> echo nameserver 8.8.8.8 > /etc/resolv.conf
Esc, :, w, q, Enter
sudo vi /opt/bootload.sh to start eth0.sh
Esc, i
add-> /opt/eth0.sh &
Esc, :, w, q, Enter
sudo vi /opt/.filetool.lst
Esc, i
add-> opt/eth0.sh
Esc, :, w, q, Enter
sudo filetool.sh -b
sudo reboot
--- DONE ---
DONE.
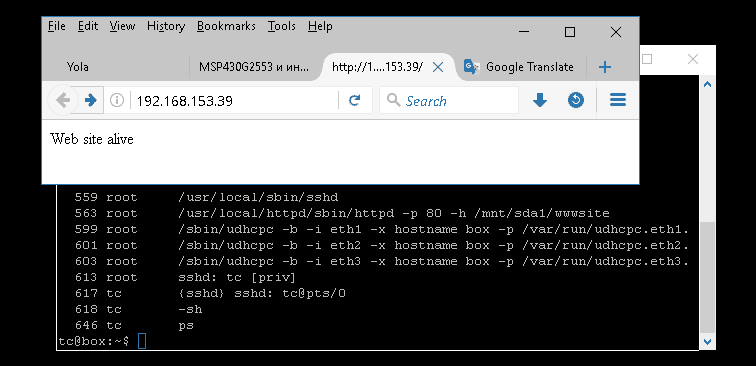
Have a static IP now.
The computer will have a permanent IP address 192.168.153.39. If you are in a network 192.168.153.xxx, and this address is free, then you are ready to go.
* If you do not need DHCP at all, kill it with: pkill -x udhcpc
The basic hardware. See this page for details.
Tiny Core Linux install. See this page for details.
Tiny Core Linux and SSH. See this page for details.
If you are going to work through the SSH (via network connection), it is easier if computer have a static IP address. It easy to do (see forum post at Tiny Core website).Four steps are required to assign a static IP address:
1. Create a new config file for interface (/opt/eth0.sh);
2. Start it on BOOT time (add eth0 to /opt/bootlocal.sh);
3. Save file (/opt/eth0.sh) for next BOOT (add to /opt/.filetool.lst);
4. Backup changes (filetool.sh -b).
Static IP address on eth0. Add config & run. Short story, skip the rest.
--- Boot from CF card ---
sudo vi /opt/eth0.sh
Esc, i
add-> #!/bin/sh
add-> ifconfig eth0 192.168.153.39 netmask 255.255.255.0 broadcast 192.168.153.255 up
add-> route add default gw 192.168.153.1 add-> </body>
add-> echo nameserver 192.168.153.1 > /etc/resolv.conf
add-> echo nameserver 8.8.8.8 > /etc/resolv.conf
Esc, :, w, q, Enter
sudo vi /opt/bootload.sh to start eth0.sh
Esc, i
add-> /opt/eth0.sh &
Esc, :, w, q, Enter
sudo vi /opt/.filetool.lst
Esc, i
add-> opt/eth0.sh
Esc, :, w, q, Enter
sudo filetool.sh -b
sudo reboot
--- DONE ---
DONE.
Have a static IP now.
The computer will have a permanent IP address 192.168.153.39. If you are in a network 192.168.153.xxx, and this address is free, then you are ready to go.
* If you do not need DHCP at all, kill it with: pkill -x udhcpc
Next